7. Remote job
With the remote job submission function, it is possible to execute a solver on a Linux machine ( **remote server** ) different from the machine on which Winmostar is installed.
7.1. Supported remote environments
Winmostar supports the job scheduler listed in Recommended remote servers.
Torque, OpenPBS, PBS Professional (PBS)
Sun Grid Engine (SGE), Univa Grid Engine (UGE), Altair Grid Engine (AGE)
Slurm Workload Manager (SLURM)
FUJITSU Software Technical Computing Suite (PJM)
IBM Platform Load Sharing Facility (LSF)
If the corresponding job scheduler is not installed on the remote server, you can execute the remote job in the following way.
Select
Runwith Queue setting.Prepare commands and scripts that mimic commands such as qsub, qstat and specify the prefix of these commands with Prefix for Queuing Commands if necessary.
It is also assumed to run basically in a bash shell on a remote server. It is possible to run in other shells, but it may require more time and effort to change the scripts.
7.2. Remote Job Setup Procedures in file mode
See Basic Operation Flow for remote job setup procedure in project mode.
See Basic Operation Flow for the overall flow of steps to run the simulation.
For details of each function, see Each function of the Submit Remote Job window.
Install and configure the job scheduler and solver on the server where you want to run the calculations. At this stage, you must be able to SSH into the server without Winmostar and start the solver on the terminal.
If you are planning to install it now, please refer to here.
If you want to run jobs without using job scheduling (not recommended when running many jobs), you do not need to set up a job scheduler and should select
Runin the Queue setting later.
Click Submit Remote Job button | toolbar_submit | on the tool bar.
Submit Remote Job window, if you want to use a profile that is already configured, select the profile to use in Profile. If you are setting up a new profile, select .
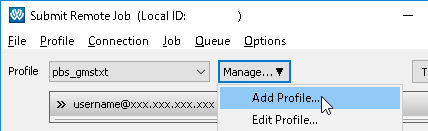
Enter the following contents on the top of window of Edit Profile.
Profile Name
Connection
Hostname
Port (normally 22 is used)
Timeout (Use default value if you do not know)
Username
Password (enter passphrase for private key, password otherwise)
SSH Private Key (only needed when using private key)
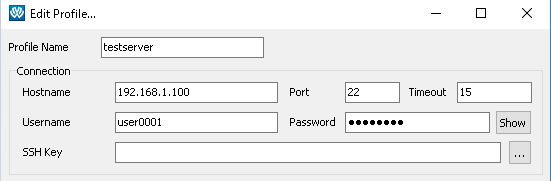
Please ask us to make multi-stage SSH connection to TSUBAME, FOCUS, etc.
To test the SSH connection, click the Test Connection button under the Edit Profile window. Check the SSH Connection Only checkbox and click OK.
When a black terminal window opens and
Store key in cache? (y/n)may be displayed at the first connection. In that case, enter y.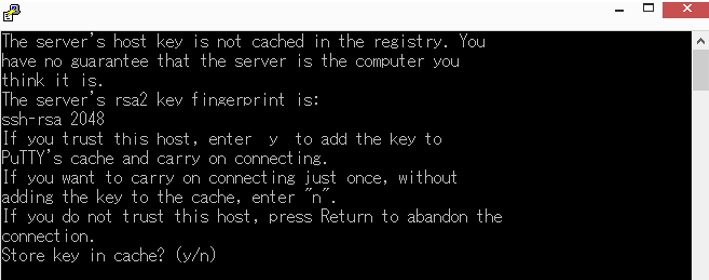
If the connection is successful, the message “Test completed successfully” will be displayed.
If the user settings or other settings are incorrect, please review the one previous setting as the message “The test ended abnormally”. Even if you entered the correct password on the spot, please re-enter it in the Edit Profile window.
If you see
ERROR: Connection timed out or an error occurred.at the bottom of the Submit Remote Job window, please reconsider the connection settings.If a private key is used, the connection may not be possible due to different key formats. See SSH public/private key authentication for more information.
If you cannot connect even though there are no problems with your input, you may be able to connect by switching the version of the library (libssh) used for SSH connections inside Winmostar. Go to [Tools] - [Preferences] - [Calculations] - [Use older version of libssh2 (1.8.2) for SSH connections] and switch the check box.
Enter the following contents at the bottom of the window of Edit Profile.
Queue & Solver
Queue
Options (command arguments for submitting jobs such as qsub)
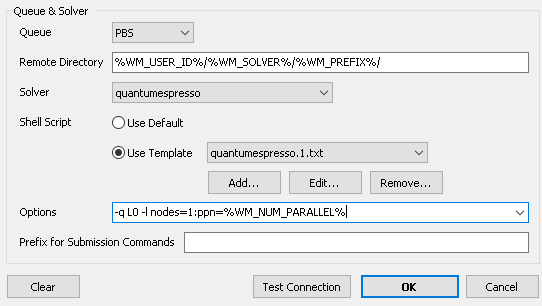
First select Queue for the job scheduler installed on the server you are connecting to. Next, enter the command arguments to submit the job, such as qsub or sbatch, in the Options field. The information about the resource to be allocated is set here.
In order to improve convenience, it is recommended to enter in the template file and in Options aliases in which settings such as parallel number and file name depending on each job are assigned at job execution . For details, see Alias string available for remote job function.
To test the scheduler’s operation, click the Test Connection button under the Edit Profile window. If the remote server’s queue is full and jobs are not flowing immediately, wait until the queue is free or continue. Check the “SSH Connection and Job Scheduler” checkbox. Enter the maximum waiting time for the Job Scheduler as well, and click OK.
If the connection is successful, the message “Test completed successfully” will be displayed.
If the setting is incorrect, the message “Connection test failed” will be displayed, so please review the one previous setting. You can check the details of Test Connection at Test Connection
If the queue is full, the test will also terminate abnormally, in which case, please wait until the queue is empty.
Enter the following contents at the bottom of the window of Edit Profile.
Queue & Solver
Solver
Shell Script
First select Queue as the job scheduler installed on the server to be connected and select solver to use on it with Solver. Next, click Use Template of Shell Script. If you do not have a template for the selected solver, enter the name of the template and the template will be opened in a text editor. If you have, select the template file you want to use in the pull down menu next to Use Template and click on the Edit button below it to open the template file in a text editor. Commands such as module load ..., source ..., export PATH = ... and other commands such as mpirun, enter the settings for using the solver selected on that server.
Template scripts include module load ... ` , :command:`source ... `, :command:`export PATH=... `, and :command:`mpirun to use the selected solver on the server. Place them between # Insert commands here and # Do not modify the followings in the template script as much as possible.
In order to improve convenience, it is recommended to enter in the template file and in Options aliases in which settings such as parallel number and file name depending on each job are assigned at job execution . For details, see Alias string available for remote job function.
To test the solver’s operation, click the Test Connection button under the Edit Profile window. If the remote server’s queue is full and jobs are not flowing immediately, wait until the queue is free or continue. Check the “Run Tests for SSH Connection, Job Scheduler, and (Solver Name)” checkbox. Set the “Maximum Wait Time for Job Scheduler [s]” to the appropriate value. Then click OK.
If the connection is successful, the message “Test completed successfully” will be displayed.
If the setting is incorrect, the message “Connection test failed” will be displayed, so please review the one previous setting. You can check the details of Test Connection at Test Connection
If the queue is full, the test will also terminate abnormally, in which case, please wait until the queue is empty.
Press the OK button to close the Edit Profile window.
Close button to close the Submit Remote Job window. When prompted “Do you want to save the remote server configuration?” Click Yes.
7.3. Remote Job Operation Procedures in File Mode
See Basic Operation Flow for instructions on operating remote jobs in project mode.
In the Submit Remote Job window, click the menu and make sure the remote server information is displayed at the bottom of the window.
If you want to start a job in file mode, click the Send & Submit button. The operation here is the same as for a normal local job.
The ID of the submitted job is displayed at the bottom of the window. ID is used to kill the job.
The directory in which the job was executed on the remote server can be set in Remote Directory of , and the one actually used is displayed on the Remote Directory field of Submit Remote Job.
When a job is started on a remote server, standard output is output to the file
winmos.oand standard error is output to the filewinmos.e.If you want to check the status of jobs submitted in file mode, use . If all jobs are complete, you will see
---.If the submitted job ends too soon,
---will be displayed even if you submit it.To check the status of a specific job on a remote server, please do the following.
ls button
cat button
grep button
tail button
Get & Open … button

The target job is displayed in the Remote Directory field. For the default setting, open the input file of the job you want to target in the main window and select the profile when you submitted the job.
If you want to run the result analysis of a job finished on a remote server in file mode on your local machine, click the Get All Files button.
The target job is displayed in the Remote Directory field. For the default setting, open the input file of the job you want to target in the main window and select the profile when you submitted the job.
After file acquisition, result analysis can be performed by the same operation method as local job.
7.4. Each function of the Submit Remote Job window
- File menu
- Revert All Changes
Discard the changes and reload the server configuration file.
- Restore Setting File
Restore the server configuration file to the factory condition.
- Import Setting File
It loads the server configuration file and adds the profile contained in it to the list of existing profiles.
- Restore Setting File
Restore the server configuration file to the factory condition.
- Close
Close this window.
- Profile Menu
- Add Profile, Duplicate Profile, Remove Profile
Add, duplicate, and delete server connection profiles. The same operation is possible from the Manage button in the window.
- Edit Profile
Edit the profile of the server connection. Some settings can be edited directly in the Submit Job window.
- Profile name
Specify the profile name displayed in the Submit Job window.
- Hostname
Specify the host name or IP address of the remote server.
- Port
Specify the port number used for connection.
- Timeout
Specify the time (unit: second) for automatically disconnecting the connection when there is no response from the remote server.
- Username
Specify the login ID (user name) to the remote server.
- Password
Specify the password of the login ID. If you click [View], password hiding will be canceled.
- SSH Key
Set the SSH key as needed.
- Queue
Select the type of job scheduler running on the remote server to be connected.
- Solver
Select the program to use in this profile.
You can also change it in the window.
- Shell Script
Check Use Default to execute calculations using the default shell script, or Use Template to customize the shell script. If you check Use Template, select a template file to use in the pull-down menu beside it, and if you want to add, edit or delete a template file Add, Edit Remove button.
You can use Alias string available for remote job function in the template file.
The template file is saved in
UserPrefin Winmostar installation folder.You can also change it in the window.
- Options
Set arguments to be given after job submission command (qsub etc.).
You can use Alias string available for remote job function for this item.
You can also change it in the window.
- Remote Directory
Specify the working folder of the remote server. If it is empty (Local User ID)/(program name)/(file name) is the working directory from the home directory. The Local User ID is the user name under Windows in operation and is displayed in the title of the Submit Remote Job window. If the Local User ID contains double-byte characters or half-width spaces, the directory name is internally converted to single-byte alphanumeric characters. If you enclose it with a single quotation like :command: ‘/ work/dir’, create
(Local User ID)/(program name)/(file name)from the specified directory. Also, if you enclose two single quotations like ''/work/dir'', a directory with (Local User ID) will not be created.You can use Alias string available for remote job function for this item.
- Prefix for Queueing Commands
When executing commands such as qsub, if you need the prefix of those commands, set them here. Normally it is empty.
- Test Connection
Test SSH connection, details of the Test Connection can be found at Test Connection.
- Connection Menu
- Test Connection and File Transfer
The same operation is possible with the Test Connection button in the window.
- Job Menu
- Send Local Files & Submit Job
Generate an input file required for calculation, transfer it to the remote server by SFTP, and submit it to the job scheduler. After submitting, the ID of the job is displayed.
Generate the input files needed for the calculation, transfer them to the remote server via SFTP, and then submit them to the job scheduler. The ID of the submitted job is displayed at the bottom of the window; the ID is used to cancel (KILL) the job.
The same operation is possible with the Send & Submit button in the window.
- Submit Job
It generates an input file necessary for calculation and transfers it to the remote server by SFTP.
- List Files at Remote Directory
Get the list of files in Remote Directory.
The same operation is possible with the ls button in the window.
- Display Remote File
Retrieve the contents of the selected file in Remote Directory.
The same operation is possible with the cat button in the window.
- Display Last Part of Remote Log File
Get the end of the log file in Remote Directory.
The same operation is possible with the tail button in the window.
- Search String in Remote Log File
Search strings in the log files in Remote Directory.
The same operation is possible with the grep button in the window.
- Restert Terminated Job
If a remote job is forcibly interrupted by the job scheduler, etc., this function restarts the calculation.
- Force Job Finalization
If all files are not generated due to abnormal termination of calculation, and Get All Remote Files does not operate normally, executing this function forcibly terminates the process, and Get All Remote Files can be executed.
- Get Remote File and …
Get a specific file in Remote Directory and visualize it.
The same operation is possible with the Get File & … button in the window.
- Queue menu
A concrete command name in the selected job scheduler is displayed in parentheses in each menu name.
- List Submitted Jobs
Get a list of jobs registered in the job scheduler.
The same operation is possible with the button with the same command name in the window.
- Kill Submitted Job
Suspends the job registered in the job scheduler. You must enter the ID of the job displayed immediately after submitting.
The same operation is possible with the button with the same command name in the window.
- List Submitted Jobs in Detail
Get a detailed list of jobs registered in the job scheduler.
The same operation is possible with the button with the same command name in the window.
- Show Information of Each Queue
Get the list of queues managed by the job scheduler.
The same operation is possible with the button with the same command name in the window.
- Show Usage of Each Queue
Get usage status of each queue.
The same operation is possible with the button with the same command name in the window.
- Show Information of All Nodes
Get information on all machines managed by Job Scheduler.
The same operation is possible with the button with the same command name in the window.
- Other menu
The same command as the item name is executed on the remote server.
- Options Menu
- Hide Other Users Info
Specifies whether to display information about other users when qstat -a is run.
- Enable Admin Mode
Used to access the remote server with root privilege
7.5. Alias string available for remote job function
Arguments of shell scripts and submit commands used when executing jobs may change dynamically depending on calculation conditions, so you can use alias strings to deal with such situations.
A list of available alias strings is shown below.
%WM_USER_ID% |
Local user ID for remote directory creation |
|---|---|
%WM_SOLVER% |
Type of solver |
%WM_INPUT% |
Input file name |
%WM_PREFIX% |
Input file name minus extension |
%WM_EXT% |
Input file name extension |
%% WM_NUM_PROC |
Number of MPI processes |
%WM_NUM_THREAD% |
Number of threads per MPI process (or total threads if MPI is not used) |
%WM_NUM_PARALLEL% |
Product of% WM_NUM_PROC% and% WM_NUM_THREAD% |
7.6. Remote job configuration file
Profile settings are saved in UserPref\winmos_profile.ini in Winmostar installation folder. When reading, in order to maintain compatibility with old versions of V8 or earlier, it is read in the following order of priority.
UserPref\winmos_profile.ini > UserPref\winmos_server.ini > wm_system\RemoteJobdefault_profile.ini
7.7. How to use Windows server
A Windows PC are available as a remote server. The following preparations are required to use it.
Install an OpenSSH server on the remote server so that clients can connect with SSH.
Install Winmostar on the remote server and always start Winmostar Job Manager.
Set as follows.
In the Profile edit window, select JM (Windows) for Queue.
Set Winmostar Path installed on the remote server to Winmostar Path.
Since the default shell script cannot be used, select Use Template to create a template file. The contents of the batch file that runs on Windows.
There are operational differences from other job schedulers as follows.
It also checks whether the job manager is running when the Test Connection button is pressed.
The information displayed by the List Jobs button is the same as Job Manager, from the left: number, status, priority, number of cores, job name, start date/time, end date/time, and batch file.
If you want to cancel the job with the Delete Job button, enter the job name.
7.8. How to connect via HTTP proxy
To connect to a remote server via SSH through an HTTP proxy server, follow the steps below.
to start Cygwin.
Enter the command as shown below. Where REMOTE_SERVER, PROXY_HOST_NAME, PROXY_PORT, and USER_NAME should be replaced by the remote server name, proxy server name, proxy port number, and user name, respectively.
ssh -L1234:REMOTE_SERVER:22 -o “ProxyCommand connect-proxy -H PROXY_HOST_NAME:PROXY_PORT %h %p” USER_NAME@REMOTE_SERVER
With the above connection, set Host Name to localhost and Port to 1234 in the Edit Profile screen.
7.9. SSH public/private key authentication
Winmostar’s remote job feature also supports connection methods using SSH public/private key authentication.
Some versions of Winmostar only supports connections in PEM format. When generating keys in the terminal, run $ ssh-keygen -m pem -f (filename of the private key) to ensure they are generated in PEM format. (OpenSSH requires -m pem because the default key format may be RFC4716).
To convert an already generated key to PEM format, run $ ssh-keygen -p -N "" -m pem -f (private key filename). In some cases, it is necessary to change the permissions of the private key file before conversion, in which case you can run $ chmod 600 (private key filename) in advance.
To convert a PuTTY Private Key (ppk) format file to PEM format, first launch PuTTYgen, which is included with PuTTY. Next, click “Load” under “Actions” and open the ppk file. If a passphrase has been set, enter the passphrase in the “Key passphrase” and “Confirm passphrase” fields. Then, from the Conversions menu, click Export OpenSSH key and enter the file name of the newly created private key in PEM format.
7.10. Test Connection
The Test Connection function is available in the Job Settings window, Remote Server Profile window, Control Remote Job/Server window, and Submit Remote Job window to test the status of remote jobs. The Test Connection function is available in the Job Settings window, Remote Server Profile window, Control Remote Job/Server window and Submit Remote Job window.
If the test fails, you can open the file used for the test. test_connection.log contains detailed information about the test and is useful for reviewing the configuration.
In SSH connection only, test the SSH connection by sftp-sending a file named send_file.txt to the server and then receive. If this test fails, review the various settings for Host Name, Port, User Name, Password, SSH Private Key, and Port Forward.
The SSH connection and job scheduler tests the job scheduler by actually submitting a simple shell script, remote_test.sh, to the job scheduler and checking that the shell script returns the expected output, in addition to the SSH connection only test. The job scheduler is tested by actually submitting a simple shell script called remote_test.sh to the job scheduler and checking whether the shell script returns the expected output. This test will fail unless the job scheduler is actually free and the submitted job runs immediately. If this test fails even though there is room in the job scheduler, please review the various settings in Queue, Options, and Prefix for Queueing Commands. submit_stdout.txt will output the standard output of the submitted command. remotejob_stdout.txt will output the standard output of the job that was executed.
In SSH connection and job scheduler and (solver name), in addition to testing the SSH connection and job scheduler, you can test the various solvers by actually submitting a simple job to the job scheduler and checking whether the job returns the expected output. Solver testing is performed by actually submitting a simple job to the job scheduler and checking that the job returns the expected output. This test will fail unless the job scheduler is actually free and the submitted job executes immediately. If this test fails even though there is room in the job scheduler, review the various settings in the template script. submit_stdout.txt will output the standard output of the submitted command. remotejob_stdout.txt and remotejob_stderr.txt will output the standard output of the executed job and standard error. winmos_script.txt is the submitted shell script.