3. Main Window
3.1. Role of each part
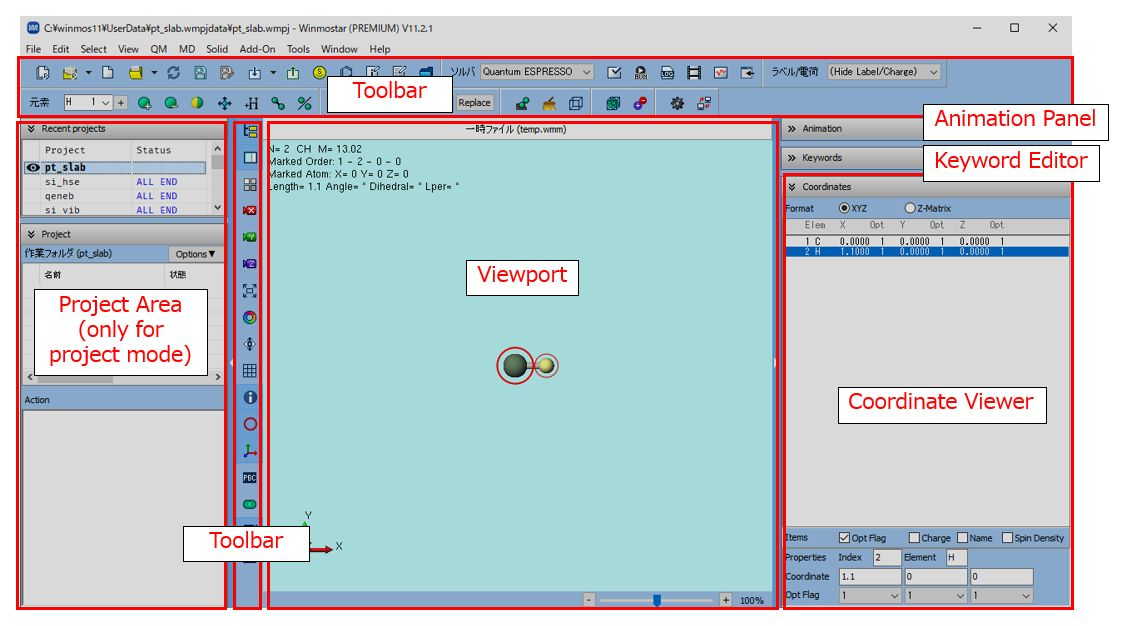
The window (called Main Window ) that appears after starting Winmostar has the configuration shown below.
In the title of Main Window, the name of the file currently being edited, the license and version of Winmostar in use are displayed.
- Toolbar
Here you can also select commonly used functions in the main menu. You can check the role of each button by overlaying the pointer. In addition, only the following functions perform special operations.
Depending on the solver selected in the Solver pull-down menu
(default is MOPAC) in the first row of the upper toolbar, the role of buttons such as Configure, Run will change.
Depending on the element selected in the Select element used in editing operations pull-down menu, the behavior of Add Atom and Change Element buttons beside it will change.
- Project Display Area
Projects created in the past are displayed in Recently used projects. Double-click on an item to open that project. The project display area is only visible in project mode.
Working Folder displays the working folder for the currently opened project. Clicking on Options allows you to select operations for the selected working folder. Double-clicking on an item opens the input file for that working folder. The eyeball icon will appear in the working folder that contains the file displayed in the molecule display area. If that folder is not selected with working folder, the eyeball icon will appear red.
In action, an operation on the working folder selected by working folder will appear.
- Viewport
The molecular structure currently being edited is displayed. By default, the structure where carbon atom (green) and hydrogen atom (yellow) are bonded is displayed.If the menu is checked, detailed information will be displayed at the top and bottom.Red circle indicates atom selection marker.In group selection state, atoms are surrounded by blue circles.You can toggle the number displayed on the side of each atom and the type of charge value from the menu.The color scheme can be changed from the .
If the :menuselection: View –> Display items –> Molecular information` menu is checked, detailed information is displayed at the top and bottom. For structures with charge or spin, the total charge (Qtot) and root mean square (Qrms) are displayed at the bottom. For structures with cells, the density and lattice constant are displayed at the bottom. If the dipole moment was calculated directly from the wavefunction obtained in the quantum chemical calculation and read from the log of the quantum chemical calculation, its value is also displayed. For structures with cells, the density and lattice constant are displayed at the bottom.
In project mode, the name of the file being displayed is shown at the top of the molecule display area. If the file being displayed is not contained in the working folder selected in the working folder, it is displayed in red.
- Animation operation area
The animation control buttons are displayed. Click title to show/hide.
- Keyword Editor
The settings in the Keyword Settings window for each solver will be displayed. Alias characters such as %WM_XYZ%, %WM_ZMAT%, etc. appear in the molecular structure-dependent parts of the keywords. Click title to show/hide.
- Coordinate Viewer
The coordinates of each atom of the molecular structure displayed in Viewport are displayed. The Display format at the top allows you to switch the display format. By default XYZ is selected.In a state where no group is selected, the line selected in Coordinate Viewer matches the atom with the marker (red circle). You can make a group selection (blue circle) by selecting multiple lines with Ctrl+left click or Shift+left click. Click on the title to show/hide it.
3.2. Mouse controls
In Viewport, you can operate with the mouse as shown in the table below. Details on how to select molecules/atoms can be found in Select menu.
Modifier
Key
|
Left click
|
Left drag
|
Right click
|
Right drag/
Wheel
|
|---|---|---|---|---|
None |
Move marker |
Roll camera |
Show context menu |
Zoom in/out |
Shift |
Select molecule
or unselect
|
Pan camera |
Delete atom |
|
Ctrl |
Select each atoms
or unselect
|
Select atoms in rectangle area |
||
Ctrl+Shift |
Replace with Fragment |
Note that you can also zoom in or out by left-dragging the right end of Viewrport.
3.3. Shortcut keys
In Main Window you can use the shortcut keys in the table below.
Basic operations New
Ctrl+N
Open
Ctrl+O
Save
Ctrl+S
Save As
Shift+Ctrl+S
Undo
Ctrl+Z
Redo
Ctrl+Y
Cut Group
Ctrl+X
Copy Group
Ctrl+C
Paste Group
Ctrl+V
Help
F1
Modelling Replace with Fragment
F6
Add Atom by Specifying Position
F4
Delete atom
Shift+F4
Add/Change Bond
F7
Delete Bond
F8
Move Atom (Translate)
F5
Change Element
Shift+F5
Add Hydrogens to All Atoms
Ctrl+H
Delete Group
Ctrl+D
Build Ring
F9
Modifying structure Quick Optimization
Ctrl+G
Move Group (Direct)
Ctrl+M
Rotate Around Axis (2 Marked Atoms)
Ctrl+R
Rotate Around Axis (3 Marked Atoms)
Ctrl+A
Change Optimization Flags of Group
Ctrl+I
Adjust All Bond Length
Ctrl+J
Orbit Group Around Marked Atom
Ctrl+F
Quick Optimization for Group
Ctrl+L
Controlling Display Zoom In
F3
Zoom Out
F2
Fit to Window
Ctrl+4
Align View
Ctrl+1, 2, 3
Show Keyword Editor & Coordinate Viewer
F10
Export Image
Ctrl+Alt+I
Copy Image
Ctrl+Alt+C